
DIY #1 at MakeThemLook has arrived!
Now, I want to preface, this is not my own creation. (I found the inspiration & printables here!) I, like most, simply went to wonderful world that is Pinterest, found some incredible ideas and re-created designs in my own home!
As you know, I love to organize. But something you may not know is that I’m getting really into cooking and baking!
Also, I have a cat.
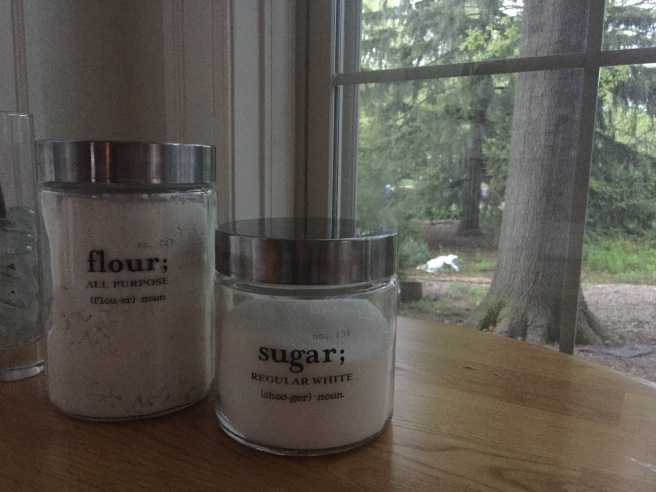
Hours ago, I had simple paper bags of sugar and flour in my cabinet that had chew marks and rips due to my cat climbing in and making herself at home. Pretty gross, right? This what inspired the DIY of the day, so we all owe this one to Ashes!
I needed containers to keep my baking ingredients organized and unharmed by my cat.
First, I headed to my nearby Hobby Lobby and picked up 3 glass containers with screw on lids. Man, that place has more glass jars in different sizes, styles and colors than I have ever seen. It was beautiful.

Then, I ran next to door to Walmart and picked up some simple, clear packing tape.
I printed out some pre-made labels (I was feeling lazy and also just really loving what Kristine from The Painted Hive had already crafted up! So, round of applause to her for her printable labels!) and wha-la! That was all I needed.
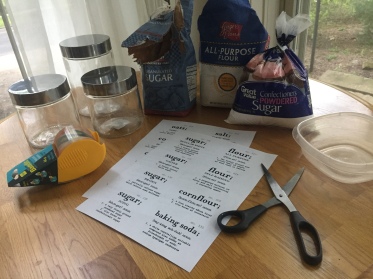
What you’ll need:
Prints of whatever labels you’d like to transfer
Glass jars or containers
Clear packing tape
Scissors
Bowl or container with water
Step one: Take a piece of tape and cover the printed area that you want to transfer.


Step two: Cut out the tape-covered print. In certain light, you can see a slight outline of the label (on the finished container), so be conscious of this when cutting this out! I wanted to be sure the space on each side was symmetrical and the corners were 90 degrees!


Step three: Place in water for 1 minute. It doesn’t have to be exact, but I held the label under for the duration of the minute just so it would be completely submerged.


Step four: After the minute is up, take it out and lay it on the table. Keep the paper covered side facing you and start rubbing it off! I was surprised I didn’t have to be too careful of rubbing too hard. The ink was pretty well stuck to the clear tape and I just took my time rubbing off the paper, wiping it away with a paper towel as I went. I noticed if this took me a while, dipping my finger in water and continuing would be helpful.


Step five: Once all of the paper is off of the back, you’ll have a clear label! Simply place it where you want on yoru container and dry it off, wiping away any air bubbles with your finger!


And that’s it! Super easy!
I tried it once with a label I was ok with ruining on a random glass container just to be sure I didn’t mess up, but you really can’t go too wrong! You can always take the label off and move it if needed!
